What We Found Behind the Wall in Eight Pre-1990 Homes
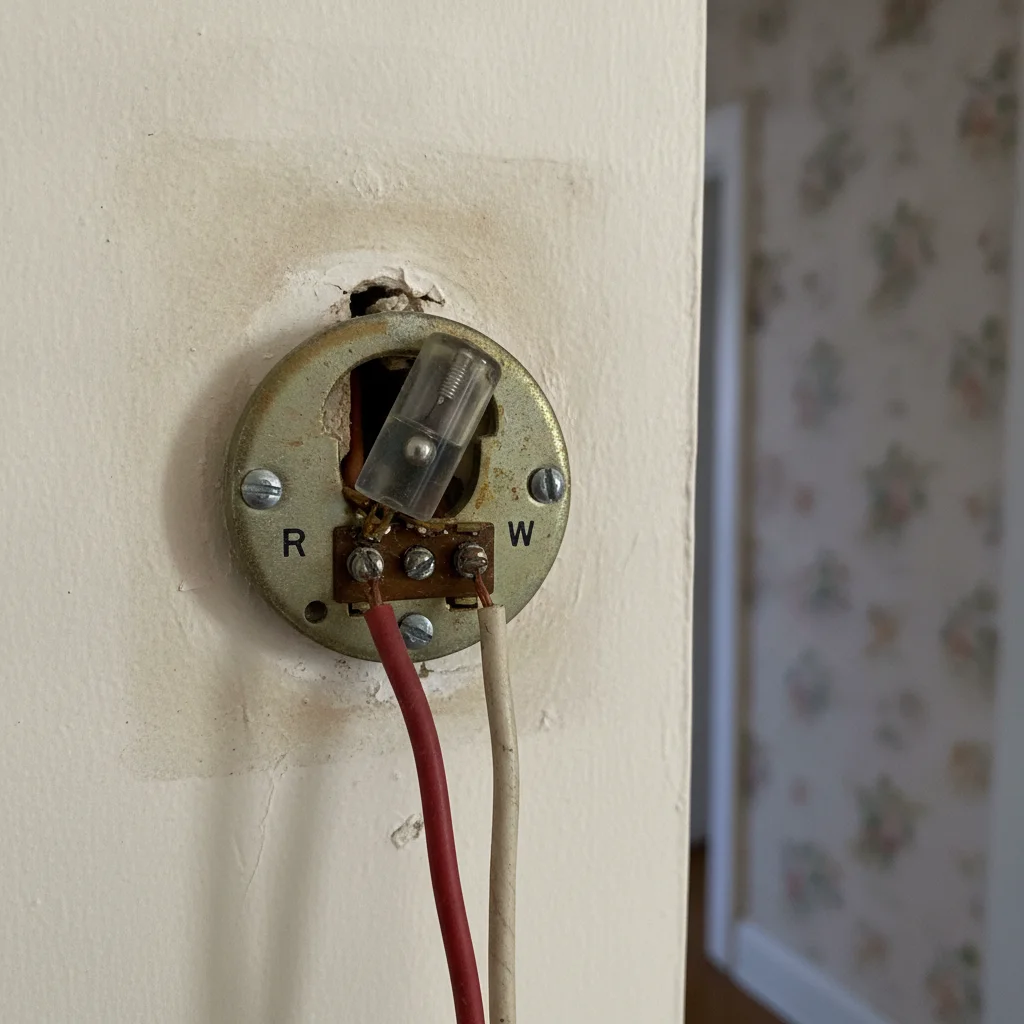
The marketing photos show a clean white wall and a modern furnace with clearly labeled terminals. What we actually found when we opened the old thermostats in eight pre-1990 homes was very different. Two-wire setups were common. Three-wire setups sometimes had the third wire unused and tucked into the wall. Furnace control boards from the 1980s and even 1970s were still in service. The wall holes were often larger than the new thermostats, and the paint around them had faded in a perfect rectangle from the old unit.
This article focuses on smart thermostat installation in older homes with real-home evidence, not marketing claims.
The most consistent surprise was the state of the furnace control board. Many were original equipment with yellowed plastic, dust, and terminals that had clearly been used for decades. The wires were often thin and brittle. In two homes the board had clearly been replaced at some point, but the replacement was still from the 1990s and not designed for the current draw of a modern smart thermostat.
- Typical 2-wire and 3-wire configurations we encountered
- Furnace board age and condition in real 1970s–1980s homes
- Physical wall and hole conditions that affect installation
The Power Problem: Why Older Homes Break Smart Thermostat Assumptions
Modern smart thermostats assume they can draw a small but steady amount of power from the furnace control board through the existing thermostat wires. Many older boards were never designed for this. They were designed to power a simple mercury switch or a basic digital thermostat that drew almost nothing when not calling for heat or cool.
In our test group, the homes with the longest wire runs (over 50 feet) and the oldest furnace boards had the most problems with the simple power connector solutions. The power delivery was marginal. The thermostat would work for weeks or months, then during a long cold snap or a period of continuous running, it would reboot or lose connection. The problem was not obvious during the initial installation because the power was just barely sufficient under normal conditions.
The Ecobee power extender kit was more tolerant of these marginal situations because it effectively creates a more robust power path. But it still required access to the furnace board and more complex wiring. In two homes even the PEK struggled until we replaced a failing component on the furnace board itself.
Real Installation Costs and Surprises We Encountered
The Nest power connector was the cheapest and fastest in the homes where it worked. Average DIY time was 35 minutes. Cost beyond the thermostat: $0. In the one home where it proved unstable after the first winter, we ended up installing an Ecobee PEK and eventually having an HVAC tech look at the furnace board. Total additional cost: $180 and two service calls.
The Ecobee PEK installations averaged 100 minutes of DIY time and $50 in parts. Two homes required professional help because the furnace was in a tight closet and the board was difficult to access. Those two installations cost $220 and $310 respectively including the technician time.
The problems that appeared 3–12 months later were almost always power-related. Intermittent reboots during extreme weather. Corrosion on terminals that had been disturbed during installation. One home needed a second service call to replace a weak transformer on the furnace board that had been marginal for years but finally failed under the slightly higher load of the smart thermostat.
The Pre-Purchase Checklist for Older Homes in 2026
Before you buy any smart thermostat for a pre-1990 home, do these things:
- Open the current thermostat and photograph the wiring and the furnace control board. Note the age and condition of the board.
- Measure the approximate length of the wire run from the thermostat to the furnace if possible.
- Check whether the furnace has been replaced or serviced recently. Newer furnaces are much more likely to have a C-wire or easy C-wire access.
- Decide in advance whether you are willing to pay for professional installation if the DIY power solutions prove unreliable.
- If you are renting, get written permission and understand that you may need to restore the old thermostat when you leave.
This checklist would have saved several households in our group from choosing the wrong power solution the first time.
When to Walk Away or Call a Professional Before Buying
If your furnace board is from the 1970s or early 1980s, the wires are very thin and brittle, or the wire run is over 60 feet, you should budget for professional installation or at least have an HVAC tech test the power delivery before you commit to a specific thermostat. The chance of marginal power is high, and swapping between Nest and Ecobee power solutions will not solve an underlying board problem.
If you are renting and the landlord will not approve professional work, a basic programmable thermostat or even keeping the existing one may be the more rational choice. The risk of creating a situation where the heat stops working reliably during a cold snap is real.
For homeowners who plan to stay in the house for many years, the cleanest long-term decision is often to pay for a proper C-wire run during the initial installation. It eliminates the power question for any future thermostat and prevents the slow degradation that comes from marginal power delivery over time.
Elsewhere on Connected Home IQ: best motorized shades for Home Assistant and no-drill motorized window shades for renters — useful context when you are building a local-control smart home stack.
Frequently Asked Questions
What is the most common problem when installing a smart thermostat in an older home?
Insufficient or unstable power from the furnace control board through the existing 2-wire or 3-wire setup. This causes reboots, connection drops, and sometimes furnace short-cycling. The problem is often not obvious until after the first extreme weather event or after several months of use.
How much should I budget for professional help in an older home?
Expect $180–$350 for a professional C-wire run or complex power extender installation in most areas. Some homes with very old or unusual wiring can cost more. DIY with the Nest power connector or Ecobee PEK is free to $80 in parts if it works without issues.
Can I tell before buying whether my older home will have power problems?
Sometimes. Open the current thermostat and look at the furnace control board. If the wires are very thin, the run is long, or the board looks ancient, you have a higher chance of marginal power. The only way to know for certain is to install and monitor, or to have an HVAC tech test the power delivery.
Is it ever not worth installing a smart thermostat in a very old house?
Yes. If the wiring is extremely deteriorated, the furnace board is from the 1970s or earlier and cannot reliably power any modern thermostat, or the cost of a proper C-wire run exceeds what you are willing to spend, a basic programmable thermostat or even keeping the existing one may be the more rational choice.
What should I do if the power connector does not work reliably after installation?
First, try the Ecobee power extender kit if you installed a Nest. If that also struggles, you likely need a professional C-wire run. Do not keep swapping brands hoping for a different result — the underlying power delivery issue will affect any smart thermostat that needs more current than your old mercury switch did.
The marketing never shows the 1978 furnace board or the brittle 2-wire setup. The real stories from older homes show that smart thermostats can work, but the installation is rarely as simple as the box suggests. Do the investigation before you buy. The difference between a smooth experience and a series of service calls often comes down to whether you understood your specific wiring situation before you opened the box.
Related reading on our sister sites: Best Smart Home Air Quality